
No Truly. It's.
Here's how we made it happen...
To begin with, this flooring wasn't also section of our original bathroom renovation plans. It actually began with a sink, after that wallpaper and certainly will finish with a modified medication case. We did this flooring due to the Renovation Snowball: after the other things had been done, the old floor seemed more awful than ever before.
It began around 10 pm on a Saturday around ripping within the old plastic flooring. Around midnight, as we were hauling the bathroom . off its anchor bolts and lowering it gingerly in to the bath tub, we uttered G.O.B.'s famous terms, "I made a large mistake...".
Why We Chose Groutable Peel and Stick Tiles:
- No subfloor needed. Whenever we did real tile, we might have the some time expenditure included for a beefed up subfloor.
- Way cheaper. Our $50 in materials did your whole room
- Simple. A beginner DIYer can perform this - the slices tend to be quick (no damp tile saw required) assuming you mess up a tile - you are just down $1.50 approximately.
- Quick. We did this entire work in a day: no wait time for drying glues before grouting.
- These tiles look remarkably realistic. Perhaps not real, but quite darn close.
the way the peel and stick tile have organized after 4 many years of usage.
Material you will need:
- Utility knife, straight edge and area to cut tile on.
- Optional: an electric jigsaw. For those who have some funny cuts this may save your self your day. We utilized ours across the bathroom and home trim.
Procedures:
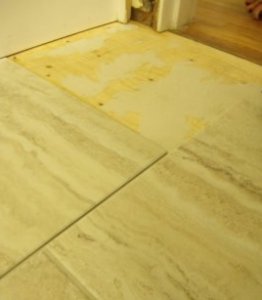
 1) occupy the old flooring.
This is the most time intensive step. Ours had been well adhered positioned by the previous owner. (My father-in-law, and so I don't state anything disparaging...) we slashed with a utility knife, scraped with a scraper and sanded with a palm sander.
We nonetheless did not get all of the old glue and paper backing from old floor off, but I figured if it held on this lengthy, it could oftimes be okay for the cheap-o phony tile work too. Most Important - the outer lining ended up being level.
2) go the toilet.
I am aware you do not need. We did not either. But it is much easier than you might think and makes the entire job better and simpler. Moving the bathroom . helped with the wallpaper and artwork behind the tank and it also made tiling very easy across the toilet base.
It's also wise to get other things taken care of which will trigger tile-headaches.
3) Get Peelin' and Stickin'
When the floor is prepared and obstacles off the beaten track, begin peeling and sticking! The groutable tile in fact offers a margin for error (once the grout fills in areas between), however if you have got a big area to-do, you may want to get out a pencil and straight-edge and run some fast guide lines for each line.
Since it ended up being for all of us, Robin only lined it up using the wall and worked across. We utilized a staggered, brick style layout. Robin had been careful to really have the marble grain go in the exact same path. This offered our tiny restroom the appearance of width.
 We did all the big tiles that did not need fancy slices very first. These tiles have become very easy to cut; fundamentally, score a line with a utility blade and break 'em. It's very comparable to cutting drywall - when you may do that, this can be done.
Difficult slices we performed at the end, with measuring, sketching the funny curves and sides and then cutting with a jigsaw. I cannot imagine exactly how difficult many of these cuts would-have-been if it was actual marble. I would have wrecked even more dollars in marble than this entire room expense regarding fake-tile.
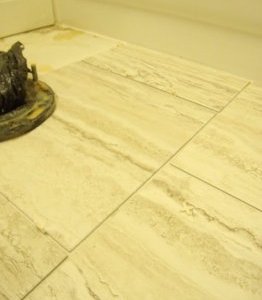
4) Grout it. Grout it sincere great.
When things are tiled, you can begin grouting immediately, given that peel-and-stick have no need for over night to setup. We got the kids to jump around to them slightly to make sure these were caught alright then i acquired the grout things together.I had never grouted before either, prior to this. We figured it mayn't be as easy as the guidelines regarding package, but once again I happened to be amazed.
Make the float, information up a softball dimensions blob of grout and begin working it into the grooves. I alternated a pressing, swirling movement to go the grout around with 45-degree angle edge drags of float to remove the excess.
Be sure to work additional grout into sides, around lavatory flanges or elsewhere you've got a strange space. It surely addresses most errors. We worked in sections, performing half the space because of the float and grout and utilizing sponge and water to wash within the excess. I had countless extra.
5) Are you Sponge-worthy?
When workin' the sponge, have a complete container of liquid helpful and rinse regularly. Make sure to get all the grout from the baseboards, bathtub, home, kids or other things your careless grout application has covered. It's your only possiblity to get those areas spotless, but your goal is not to obtain the tiles themselves totally clean. Get the huge chunks, but expect a little bit of grout haze from the tiles on their own.
 do not scrub them today, as you will wind up using grout from the bones, which I'm convinced had been the purpose for this whenever we started (although I actually lost track during renovation-delirium that sets in at about any of it point).
4 hours later on, you can get the sponge completely once more and present the tiles your final clean-up.
You should not use the area for at least twenty four hours, therefore use some sort of Mission Impossible design apparatus to hang from the roof and clean the grout haze from the tile. Seriously, I don't understand why companies put confusing guidelines like this regarding the packaging. I wound up kneeling on two tiles and reaching as much as I could, after that going a little and having the remainder. If the area had been big, We probably could have left the whole lot before the following day to clean up.
6) Put Your Toilet Back.
The only price to getting rid of your lavatory is regarded as these Wax Bowl Rings. About $2.
Very carefully eliminate the old wax ring. It generally does not must be perfect but make your best effort. Once again, we observed this tutorial: here. (We trusted this guide implicitly, mostly because some one tangled up in path to Avonlea would not dare lead us astray.)
Hey, Wax Bowl Ring People - is this the only real color you might create your item?!
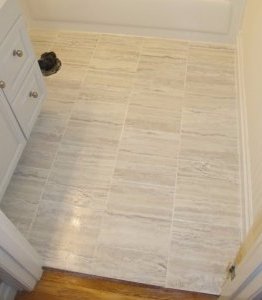
7) stay back and admire your handy work.
And be sure to share with everybody how much it set you back to-do - it's going to: Blow. Their Particular. Minds.
Once we started off about this project, I had serious reservations exactly how great Peel-and-Stick tile could look. Fundamentally, they're synonymous with bad, half-assed, make-do renovations that 20-somethings do before they know any better. I really believed ours would definitely appear to be a crappy, half-assed, make-do reno that 30-somethings do, although they are doing know better.
We positively like it.
Cost Breakdown:
- Peel & Stick Vinyl Tiles = $ 34
- Grout = $11
- Misc. products = $5
Complete Price = $50!

Share this Post
latest posts
-
 Natural stone Tile Seattle February 27, 2025
 -
 Natural stone tiles Dublin January 28, 2025
 -
 Stone tiles for kitchen floors December 29, 2024
 -
 Stone floor tiles Norwich November 29, 2024
 -
 Install stone tile on drywall October 30, 2024
 -
 Crystal Stone Coffee Mosaic Tile September 30, 2024
 -
 Stone Mosaic Tile Company August 31, 2024
 -
 Stone Tile wall cladding August 1, 2024
 -
 Installing Travertine subway tile backsplash July 2, 2024
 -
 Adhesive for stone wall tiles June 2, 2024