 So, what is Airstone? Officially, it’s a manufactured stone veneer containing 80per cent recycled products. This means it is less heavy than real stone in addition to concrete, plus it’s eco-friendly. To put in, all you have to is adhesive, a putty knife, and a hacksaw. You should use it for interior and outdoor applications (on proper substrates).
But here’s my personal favorite component: it’s inexpensive. You can get most of the great things about an all-natural rock appearance and never having to get thinset, grout, spacers…or a wet saw. Added bonus: you don’t have to know how to use any of that stuff either.
Since I tackled my cooking area backsplash the old fashioned means awhile ago (got the wetsaw in cellar to show it), I thought for a long time towards simplest way to feature Airstone in my home. I wanted to try something I experiencedn’t seen on Pinterest yet. The notion of an accent wall surface appealed to me, but i really couldn’t decide in which I’d get it done. If you see the name for this post, you'll probably decipher where this task is heading…
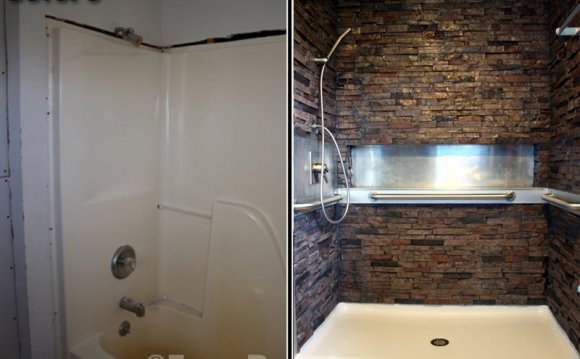
That’s the visitor bathroom (the key floor restroom) in every it's builder grade glory- a pre-fab, 3 walled tub/shower surround with zero awesomeness. I've been dreaming of “re-facing” the leading for the tubs both in bathrooms for a while (We have an alternative product in mind for upstairs, it starts with a “bead” and ends up with an “oard”). Since I have knew Airstone can be used outside, I got quite stoked up about the prospect when trying it inside application. Certainly one of their installation experts provided me with the proceed in an instant talk, then I had been off and running.
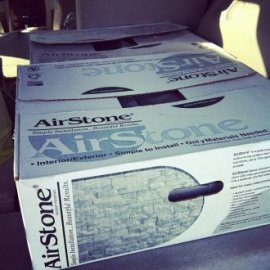
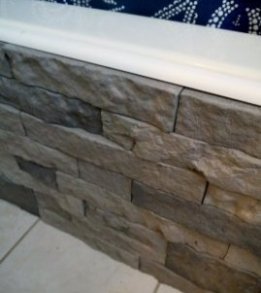
 Currently Airstone is available in two colors, one becoming more gray while the other more tan. I chose the grey (springtime Creek) because I was thinking it could look most readily useful using wall colors and vanity. Since I have ended up beingn’t rounding any sides and both edges associated with tub have actually walls, we only needed the flat rocks (there are “corner” and “natural side” types). Two boxes of Airstone, 2 tubes of PL Premium Construction Adhesive, a putty knife, and a hacksaw arrived house with me personally. Cue Instagram.
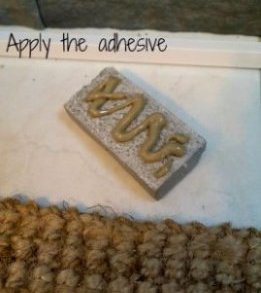
I already had a caulk-gun, thus I performedn’t get one- however you will require one when it comes to exterior adhesive. P.S. I’m convinced there's no these types of thing as a dripless caulk weapon. But to the install, here its in two steps:
If it appears easy, that’s since it is. You just lay the rocks end-to-end nevertheless fancy, trying to alternate the seams (like timber flooring). Today if you have one of these pre-fab tub/showers deals, you might already fully know the bathtub front side just isn't completely level. If you consider the top correct spot associated with the bathtub you can observe the tub goes somewhat in. I'd a hunch that I’d manage to make up aided by the Airstone because of the normal level variation in each stone, some thing We doubt will be feasible with a straight tile task (at the least maybe not without installing a-flat area first). Totally worked. Yeah, that almost never happens if you ask me regarding very first try. I became surprised too.
 Because my bathtub is not very broad, I started with rocks on a single end and setup about three or four, I quickly moved to another side. I recently performedn’t want to have all cut pieces at one end. Nevertheless the glue features rather a long working time, to help you change rocks as needed if you like. Make your slices while you get, it's most readily useful not to ever move onto the next line with a hole in the past. A straightforward hacksaw will reduce Airstone, no energy resources required.
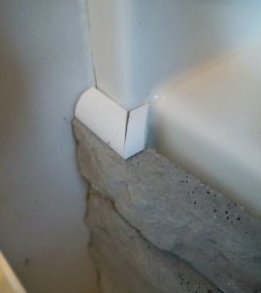
When I surely got to the very last row of full level bricks (to not ever the most notable, but since far up as I could go), we began tinkering with trim. I tried a bit of molding (like seat railway), but in fact easy one-fourth round looked ideal! Initially I had to manage that small inset area in place though, keep in mind? My first desire would be to disregard it…after all the bath curtain would protect it anyway. I’d simply cut a piece to go the length of the inner part and call-it just about every day.
But I Recently couldn’t! I am talking about I’ve already been using my small miter package saw for awhile today, and it’d be a shame to waste those abilities…
Ok-so by those cuts you'dn’t think I have abilities, but we swear the issue is that it’s not really a 90 level place. We knew I’d need to fudge it with caulk and spackle.
Looking quite completed today, I’m on a roll!
Ok last one, consider that artistry. Amazing. Or, it will be after come spackle, caulk, and paint- which will be still when you look at the works (material takes time to dry, yo). And it will be covered by curtains. Prepared?
Ohmygosh we totally pulled a curtain turn on you too, did you notice? Really i really couldn’t well put in a posh tub surround and protect it up with a curtain now may I?
If you are diligent, you will find two matching curtain panels which are not lime green at Ross. It took myself about weekly. I also picked up a collection of sheers with an added bonus valence (for another project, you’ll see!). I got a supplementary tension rod for $4.99, thus I think it was less than $25 alltogether.
The curtains and (1) sheer panel take a pole, and the liner is on another pole behind. I’m unsure if this is ideal permanent option, essentially the lining and sheer would be collectively (within my head, i would like the curtains to keep however therefore the liner/sheer to be exposed and shut). I’m nonetheless focusing on executing that. But this works well with now, particularly as it’s a guest bathroom. I might add a cornice box up top, and that's why the curtain level is kinda weird. Easily add the container, I'm Able To reduce the pole…

Share this Post
latest posts
-
 Natural stone Tile Seattle February 27, 2025
 -
 Natural stone tiles Dublin January 28, 2025
 -
 Stone tiles for kitchen floors December 29, 2024
 -
 Stone floor tiles Norwich November 29, 2024
 -
 Install stone tile on drywall October 30, 2024
 -
 Crystal Stone Coffee Mosaic Tile September 30, 2024
 -
 Stone Mosaic Tile Company August 31, 2024
 -
 Stone Tile wall cladding August 1, 2024
 -
 Installing Travertine subway tile backsplash July 2, 2024
 -
 Adhesive for stone wall tiles June 2, 2024