 Use pebble tiles creatively in a shower.
Northern California features a good green and lasting aesthetic. Residents appreciate the good thing about nature and always deliver a few of the outside to the residence in an all-natural and innovative method. Normal stone pebbles became more prevalent in spa-like bathrooms for his or her smooth feel and attractive look. These tiles tend to be attached in sheets and mortared to any strong substrate.
Gauge the width regarding the area you want to tile. Divide that measurement in two and level. Breeze a chalk range at your level. Assess the period of the location. Divide in two, level and snap a chalk line. The crossed chalk outlines should mark the center of your area, and your lines should really be parallel along with your wall space.
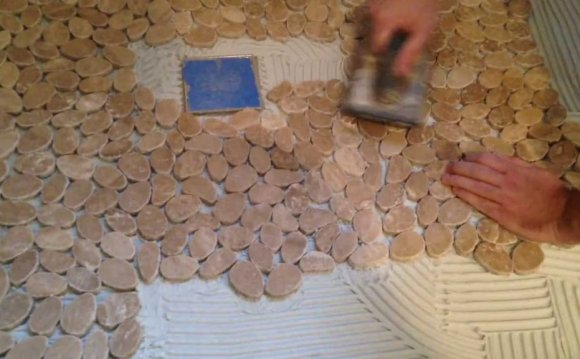
Combine thinset mortar. Spread thinset over 3 sqft straight away next to your crossed chalk outlines. Pull a one-quarter-inch V-notched trowel through thinset at a 45 level angle. Fall into line the sides associated with normal stone pebble tile sheet along with your guide lines. Hit the sheet securely into the mortar. Remove any mortar that oozes up between your rocks. The sheets are designed to overlap like a puzzle. Fit and put in two extra sheets adjacent to initial sheet.
Put a 2-by-4-inch straight board, two to three foot long, across tile sheets, flat side down. Tap the board with a hammer to level the sheets to each other. Move the board around before the sheets tend to be level, then examine making use of an amount. Remove the board and cleanse any mortar that features oozed amongst the stones with a moist sponge. Remember you ought to keep half the thickness of this pebbles clear for grout. Wipe off any mortar at the top associated with the pebbles. Resume tiling.
Cut pebble tile sheets by establishing the mesh side and cutting with a damp saw. Eliminate specific pebbles and cut the mesh to match around hurdles. Tile to one-quarter inch of walls and wood surfaces. Do not allow mortar to be tight against timber because can cause cracking later. Let the mortar to dry for 24 hours.
Seal all of the pebbles utilizing a grout sealer and a disposable paintbrush. Permit the sealer to dry for 24 hours.
Combine grout in accordance with the manufacturer's guidelines. Distribute the grout over 24 square inches with a grout float. Hit the grout in the middle the pebbles. Begin washing the grout from the pebbles within fifteen minutes. Cleanse the grout using a grout sponge and clean liquid. Manage cleansing until just a really faint haze is visible. It is usually advisable for just one person to grout while another cleans. Permit the grout to dry for three hours after which polish the pebbles with a cheesecloth.
Things You Needs
- Tape measure
- Chalk outlines
- Normal stone pebble tile sheets
- Thinset mortar
- 1/4-inch V-notched trowel
- 2-by-4-inch board
- Hammer
- Sponge
- Amount
- Wet saw
- Goggles
- Scissors
- Grout sealer
- Disposable paintbrush
- Grout
- Grout float
- Grout sponge
- Clean liquid
- Cheesecloth
Tip
- Maintaining the pebbles clean during installation will save you most work and time through the grout phase.
Share this Post
latest posts
-
 Natural stone Tile Seattle February 27, 2025
 -
 Natural stone tiles Dublin January 28, 2025
 -
 Stone tiles for kitchen floors December 29, 2024
 -
 Stone floor tiles Norwich November 29, 2024
 -
 Install stone tile on drywall October 30, 2024
 -
 Crystal Stone Coffee Mosaic Tile September 30, 2024
 -
 Stone Mosaic Tile Company August 31, 2024
 -
 Stone Tile wall cladding August 1, 2024
 -
 Installing Travertine subway tile backsplash July 2, 2024
 -
 Adhesive for stone wall tiles June 2, 2024