
The pre and post photo could be the condensed form of the project. In the event that you feel like sticking around to see how we achieved it, simply understand that you are in for a ride (it really is a lengthy post!) The fee breakdown has reached the underside.
Here we go! (beginning with where we left-off to my last post)
After obtaining the old hearth surround torn out, it absolutely was time and energy to build when you look at the brand-new framing. We had been in a position to re-use most of the old lumber which helped spend less a wee little bit. Originally the hearth box ended up being sitting on the ground and now we believed it could look better if it were raised up somewhat. We additionally desired the newest fireplace surround to go completely into ceiling for a more modern/dramatic appearance. I nevertheless can not thank dad adequate for assisting us with this!
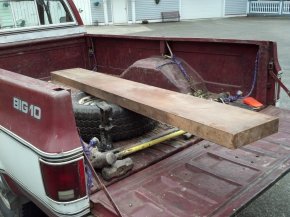
See mantle piece clamped up above the hearth? It came out of a 1930's house! We had been searching large and reduced for a mantle and most of new people we liked fell in to the $300 range. Ouch! Among my dad's pals ended up being doing demolition work with a 1930's house and could save yourself the mantle. He heard we had been seeking one and made a decision to gift it to united states as a housewarming present. What a generous present! It might have appeared to be a dirty bit of lumber initially, nonetheless it washed up quite well. It is solid as a rock and has a beautiful patina and tight whole grain (we believe it is some form of maple).
 Since it was therefore huge, we'd to reduce it right down to make it work for the fireplace. Let me tell you, I winced through the whole cutting procedure. It simply believed incorrect to cut up something with a great deal history, even though it had been "recycled." But we had to complete everything we needed to do and I'm happy to say we definitely love just how it proved.
Under: my father and opa working together.
We'd a chunk big enough which will make several corbels so I got to work making a template and cutting them away (note: it certainly is a smart idea to put on safety cups when utilizing any saw. I did not, which is just silly)
The "rough draft" mantle:
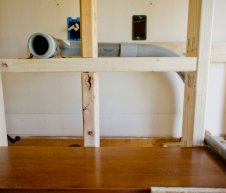
Jumping back to the framing, you could have in addition seen a gray pipeline sticking out.
Since area is quite tight in the condo, we decided in advance that we had been planning to mount our television above the hearth. We used 2" conduit for hiding cables that connect with it.
We drilled pilot holes for the mantle and hung-up Durok concrete board. We left the edges open so we cold bolt inside mantle and corbels from backside.We then hung up our TV wall surface mount and stained the natural items of the mantle to match the old shade.
In addition painted the hearth box because it had been quite scuffed up from earlier owners. Thank you good ol' trusty can of satin black colored spray paint!
We hung-up it to get the viewing direction right and also make sure we might have enough room for the rock veneer behind it.
Our program would be to keep an empty room within the stone where in actuality the wall mount ended up being, but we noticed that television would not cover-up as much for the blank room as we believed it can. We took down the wall mount and take off a few ins therefore the rock would cover up more. The spot has also been painted black colored to full cover up it better.
 Today it was time for you put up the rock veneer (Eldorado rock in Chapel Hill shade). We moved with a manufactured stone veneer because: 1) it absolutely was much cheaper than genuine stone but still seemed quite persuading. 2) it absolutely was approximately half the extra weight (definition we could make do with just utilizing concrete board by itself instead of reinforcing it with metal lath, and 3) it comes down in "tiles" therefore wayyyyy less slices which will make. I bought a dry dust mortar, added liquid and stirred utilizing a drill mixer attachment through to the mortar had been the consistency of peanut butter. It is possible to learn from my mistake right here: just a little goes a long way. We made excessively in the very first group for what we're able to have completed in one day and wound up putting aside many it (which triggered united states going back to Residence Depot purchase another bag once we completed up the task the next week-end, doh!)
We rented a paver saw and arrange it into the restroom. I have never ever utilized any sort of tile/paver saw before and so I had been slightly nervous, however it ended up being incredibly simple. The main element was to go-slow. I really do want i really could have inked the cutting outdoors, that thing tends to make a MESS! I remembered my security goggles now.
Before generally making cuts, I outlined the tiles around the fireplace to obtain the setup right (though it seems an extra corner piece snuck in to the photo...hmmm). Side note: we bought hardwood flooring a while back and at some point tear out the carpet within room. Since we knew just what the thickness of this flooring would-be, we made shims off scrap wood that were somewhat thicker as compared to floor coverings and put all of them around the fireplace. We additionally break up a few of the underlayment and added it and. This means that we are able to obtain the floors within the stone later on.
 Going up! Neal soaked down the cement board with a damp cloth before dispersing from the mortar so your concrete board wouldn't suck the moisture from the mortar (which will damage it). He also utilized a level to make sure that each line of tile had been straight and utilized shims occasionally to even out tiles which were wonky. Rubber gloves are certainly a must-have with this so we spent several additional bucks to get a stainless metallic trowel with a rubber grip (it will not get rusty and it's definitely convenient to put on onto for an 8-hour work duration!)
In general we had a pretty good routine going, we made all cuts and Neal put up the rock. We unearthed that how to get the tiles to stick would be to place mortar from the wall AND straight back butter the tiles. When we had purchased a trowel with larger notches we possibly could have averted performing both (here's another opportunity to study on our errors!) but since we didn't feel making the trip back into the shop we utilized this process alternatively. Thus far the tiles haven't attempted to jump-off the wall therefore I believe we are safe.
Closeup of (dirty) wall surface mount area:
I happened to be quite pleased about the way the wall surface mount area ended up. It's small enough to be hidden by the TV or if we go to sell/rent the condo in the future and someone doesn't want their TV above the fireplace, they can easily cover up the spot with some artwork or a mirror.
Done! Well... 95% done. We however should color the cut edges of tile & any chips in stone aided by the patch kit (you can't see it in the image nevertheless the edges tend to be a very light gray and stick out like an aching flash using lighting circumstances) and we have to do another pass at cleaning drips from the mortar, both of which we'll may be focusing on these days.
Therefore, you may be wondering simply how much a project similar to this prices? For all of us it absolutely was about $1000, although we did not have a lot of the tools needed seriously to perform some work and may have saved an additional $100 had we planned a bit more very carefully. Not really an inexpensive project, but i actually do feel it generates a big difference in the space (it makes it feel taller, that will be a good bonus). Discover an approximate breakdown of our prices:
$575 when it comes to Eldorado rock veneer. We initially spent about $825, which included 20percent additional sq ft of stone in the event of breakage (which is pretty standard) but was also slightly extra because we forgot to subtract the sq ft part of the hearth field whenever I was first determining simply how much rock we'd need (stupid blunder). We did not become making use of two cardboard boxes and came back them for $250 in credit, but must pay a restocking fee of $75).
$130 for two complete times of paver saw rental
$45 for 3 bags of mortar (we're able to have saved $15 basically had not made excessively mortar in the 1st group)
$40 for a ladder (we don't get one)
$210 for tools & other materials (lumber for framing, conduit, cement board, screws, squirt paint, tarnish & Old English the mantle, the exercise little bit mixer attachment, a container, trowel, gloves, goggles, and whatever else I may be forgetting)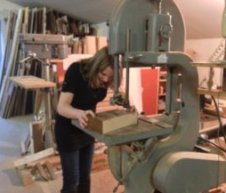


Share this Post
latest posts
-
 Natural stone Tile Seattle February 27, 2025
 -
 Natural stone tiles Dublin January 28, 2025
 -
 Stone tiles for kitchen floors December 29, 2024
 -
 Stone floor tiles Norwich November 29, 2024
 -
 Install stone tile on drywall October 30, 2024
 -
 Crystal Stone Coffee Mosaic Tile September 30, 2024
 -
 Stone Mosaic Tile Company August 31, 2024
 -
 Stone Tile wall cladding August 1, 2024
 -
 Installing Travertine subway tile backsplash July 2, 2024
 -
 Adhesive for stone wall tiles June 2, 2024