
 The rugged, normal look of split face tile is stunning in so many applications that it is easy to find places for it around your home. Indoor or outside, the initial, textured effect of split-face rock and tile provides a rustic, classic appearance, while appropriate and accurate installation provides clean lines and cohesive arrangement that betray a contemporary sensibility and a contemporary eye toward high quality. It's simpler than you might think to put in a split face tile and skirt the price of hiring a specialist. Reach finally your tiling aspirations with some preparation and some basic steps.
What's Split Face Tile?
Instead of the smoothness and large polish of many glass or ceramic tiles, imagine the difference and texture of normal rock. Manufacturers frequently make split-face tile from stratified rock or rock by cutting it or breaking, such that the split face exposes the bedding. The end result may be the visually appealing effectation of rough-hewn rock. Usually individuals slice the stone using bedding set on a horizontal bias, but vertically set bedding cuts are available besides.
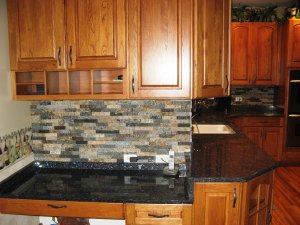
Lots of people frequently use split-face tile for additional programs, particularly for raised flower beds, outdoor fireplaces, plus liquid functions. The raw aesthetic associated with split face lends it self to outdoor design, but there are numerous places where it makes a wonderful impression indoors, and. Utilize split face tile as backsplash tile in a rustic or country home, or do the installation as an accent wall surface in your bathrooms or den.
Getting ready to Install Split-face Tile
Start with planning the wall or area for tiling, which include removing any hardware, like light switches also fixtures, and eliminating the current area base. In the event your project is bigger scale, be sure you attach tiling board throughout the whole surface before you begin. Cannot stick tiles right to drywall.
Utilize a tape measure and amount to measure and mark to the center lines of location you wish to tile. Discover both horizontal additionally the straight center, as you have to divide the space evenly and exactly into parts when you set the tile it's completely straight. Use a chalk breeze range to mark completely straight lines. Dry fit the tiles which means you know you're getting the last appearance you need. Use a wet saw to reduce and profile any tiles to size for sides or sides. Assure your tiles stay directly, install a batten.
Installing Split-face Tile
Stir the mortar according to package guidelines and permit it to slake, this means allowing it to stay for a quarter-hour, then stir once more before you apply. Apply the mortar toward tiling area with a tiling trowel, employed in areas of about 2 by 3 foot. Make use of the long, notched region of the trowel to apply and scrape the mortar into spot, making roughly parallel outlines from notches. Put the tiles very carefully, twisting all of them carefully to actually set in the mortar. Destination tile spacers while you visit keep consitently the sides and edges aligned the way you would like them.
Methods for A Perfect Tile Installation
Steer clear of the urge to reduce sides whenever measuring and marking the area. Make use of a laser measure and amount when it comes to many accurate results. The worst and simplest blunder you possibly can make will be believe a fixture or roof is degree, throwing off the entire design.
In the event that tile mastic or mortar develops a thin epidermis, utilize a disposable scraper to get rid of it and apply fresh mortar. If you are laying tile in a damp or moist environment, a thin type of silicone caulking all over sides of the set up keeps the tiles extra secure.
With all the tiles put, mix your grout. Sanded grout is for spaces larger than 3 mm, and unsanded grout is actually for smaller rooms. Apply the grout with a grout float, employed in 3-by-3-foot places. Allow it to cure for 20 moments, after which wipe excess grout away with a warm, wet sponge. Let it heal for at the least three hours, then use grout sealer.
Just how to purchase split-face Tile and materials on e-bay
Find out about the basic tips and treatments for setting up split face stone and tile in your home or company, to check out just how simple it really is to manage most tiling jobs your self. If you're prepared to begin your project, store the countless directories on e-bay discover everything you need, from drop cloths and safety eyewear to your split face pieces by themselves.
Share this Post
latest posts
-
 Natural stone Tile Seattle February 27, 2025
 -
 Natural stone tiles Dublin January 28, 2025
 -
 Stone tiles for kitchen floors December 29, 2024
 -
 Stone floor tiles Norwich November 29, 2024
 -
 Install stone tile on drywall October 30, 2024
 -
 Crystal Stone Coffee Mosaic Tile September 30, 2024
 -
 Stone Mosaic Tile Company August 31, 2024
 -
 Stone Tile wall cladding August 1, 2024
 -
 Installing Travertine subway tile backsplash July 2, 2024
 -
 Adhesive for stone wall tiles June 2, 2024