 As a home owner, creating a custom bath pan increases the value of your house. It includes a unique appearance and seamlessly integrates the shower base towards restroom floor. If you should be a DIY renovator, this tutorial shall help you comprehend the range of work included.
Related Video: focusing on your bathrooms? We've a great and simple tip for your needs!
A professional customized shower base installation, including tiling, can run-over $1000. If you dislike the appearance of pre-made fiberglass shower pans, and you also feel effective at building a custom bath pan yourself, a lovely and affordable bath base is possible for a few hundred bucks. Our customized base, for a 40x40 shower enclosure, cost us about $200 and two times of work. Here is what you may need.
Products
- Thin-set
- (2) 2x4"x8ft lumber board (to construct shower curb)
- 1/2x1"x7ft panels (to make use of as shower door design)
- Tile and bullnose tile (for shower curb)
- Mosaic tile for bath floor
- Grout
- Tile caulk (matching grout color)
- AquaDefense liquid waterproofing buffer (Redgard also is effective)
- 4" Screws
- 1" Nails
Tools
- Chop saw
- Hammer
- Protractor
- Margin trowel
- Amount
- Pencil
- Throwaway paint brush
- Tiny foam roller
- Container
- Damp cloth
Instructions
Plan and Build the Shower Curb
I discovered this diagram and are excited to note that another person has generated shower pans the way in which we performed.
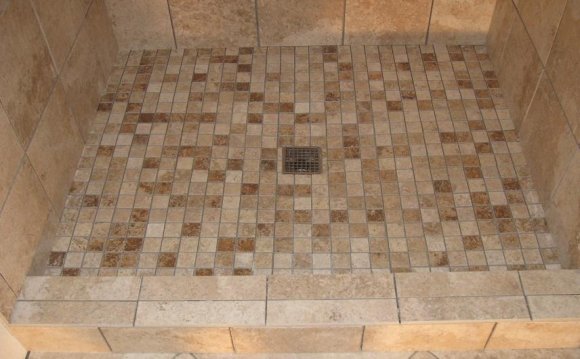
The main objective should create a completely waterproof sloped flooring, with a drain, increased advantage framework, and pretty mosaic tiles to pay for it-all up.
1. You should have your bath enclosure dimensions prior to starting creating your bath pan. In my situation, i am building a shower pan for a 40" neo-angle shower enclosure, which includes 2 glass panels and 1 cup door.
2. Utilizing the 1"x2" boards, develop a model representation of your shower door/panels.
3. When it seems correct, tape the panels right down to secure all of them.
4. The bath curb width should really be about 3-4" wide. Measure and mark the guides therefore the bath doorways sits nearby the center regarding the curb.
5. Draw the outline of your bath curb. This will be the dimensions of this mildew you will develop for the concrete curb. Bring your 2x4s mark and cut the them to the measurements of your frame.
6. Making use of the protractor, measure and mark the required perspectives to cut your internal and outer bath framework. (I haven't seen a protractor since the 5th class, therefore we utilized an angle guide that included my laser degree.)
7. Chop the finishes of 2x4s into the noticeable sides.
8. Assemble the wooden frame (with both external and inner sides) for the shower curb.
9. Take away the small boards that have been taped down. Ensure that the width regarding the curb continues to be 3-4".
10. With the little boards, cut, after that nail all of them collectively to secure your frame.
11. Drill screws into the flooring (backerboard) at every combined and about every base. Once the mud is poured and treated, these screws may help secure the curb into flooring.
12. Your framework is finished and today is prepared for dirt!
13. Combine mortar with liquid according to label guidelines.
14. Pour within the dirt and stir it to avoid environment pouches.
15. Continue filling in the framework until it reaches the top the 2x4s. Try to make the top as amount as possible. The cup shower doorways will have to be sitting on a-flat leveled area.
16. After 24 hours, your curb must certanly be hard adequate to dismantle the frame.
17. Utilizing the drywall blade, even up the edges by scraping down any burrs and defects. In addition, you like to place a small amount on the width of the curb so that the curb is leveled. If needed, use a sander to amount the curb.
18. The top of your bath drain should always be 2" above the floor. Draw a line along inner the perimeter regarding the curb and over the bath walls at 2 3/4" over the flooring. This is your guide of exactly how much dirt to put providing a 3/4" slope.
Share this Post
latest posts
-
 Natural stone Tile Seattle February 27, 2025
 -
 Natural stone tiles Dublin January 28, 2025
 -
 Stone tiles for kitchen floors December 29, 2024
 -
 Stone floor tiles Norwich November 29, 2024
 -
 Install stone tile on drywall October 30, 2024
 -
 Crystal Stone Coffee Mosaic Tile September 30, 2024
 -
 Stone Mosaic Tile Company August 31, 2024
 -
 Stone Tile wall cladding August 1, 2024
 -
 Installing Travertine subway tile backsplash July 2, 2024
 -
 Adhesive for stone wall tiles June 2, 2024