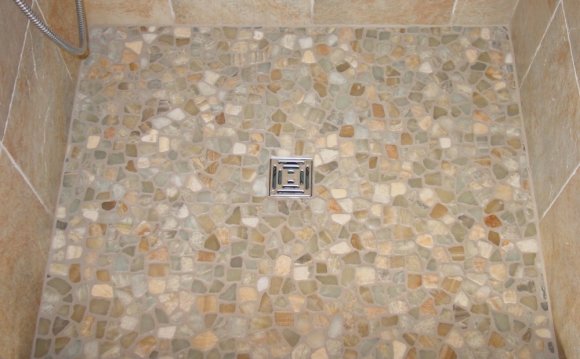
 Shower floors tend to be one of the more popular utilizes of your beautiful Pebble Tile. Our tile options are perfectly designed for bath and bathroom flooring. Our consumers love the gentle, massage like experience regarding the pebbles to their bare feet!
View the video and see the directions below to observe how effortless its to install Pebble Tile inside bath!
1: Mask the Drain and Edges utilize quickly removed artist's tape to guard the strain before you start the tile work. Additionally put tape around the shower stall just above the height of where in actuality the tile will remain to guard the bath surround.
2: Apply the Thinset begin in a back corner of the bath and spread thinset regarding the bath floor with the level side of a 1/8" notched trowel. After that utilize the notched edge of the trowel to produce ridges within the product keeping the trowel at about a 45-degree perspective. Protect a location equivalent to about three sheets of pebble tile.
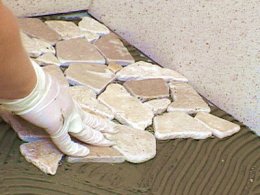 Step three: Set initial Pebble Tile Sheet Press the first sheet of pebble tile to the thinset, butting the sheet as near as possible toward wall space. Wiggle the sheet of tiles a little to settle it when you look at the thinset.
Step 4: Continue Tiling continue steadily to distribute thinset and include sheets of tile towards the floor, butting the sheets as close as possible. Combine thinset as essential. If there isn't room for a full sheet, remove tiles as needed from the sheet and set-aside, after that cut the mesh backing with a utility blade and set the remaining portion of the sheet typically. Also utilize this strategy to set the tile across the strain.
Step 5: Tap the Pebble Tile set up Above the tile, spot a straight, flat board that spans numerous tiles and gently touch it with a mallet to completely set the tile and make certain the faces of tiles are within exact same height.
Action 6: Secure the Pebble Tile. Normal stone pebble tiles needs to be sealed before grouting. Look at the guidelines of your plumped for sealer and make certain to secure the pebble tile before grouting.
Step 7: Apply the Grout. Scatter grout over the tile making use of a grout float. Support the float at a 45-degree angle, working the grout into the spaces involving the tiles.Action 8: cleanse the Tile Taking treatment never to pull grout up from between tiles, wipe away the haze with a moist sponge. Rinse the sponge often maintain it clean. Allow the grout remedy entirely based on the bundle directions. Use a clear fabric to wipe any continuing to be haze from the area of the tiles. Permit the grout to heal after the grout bundle instructions.
Step 9: Seal the Grout Seal the grout for much easier cleaning later on. For the right results, follow the instructions for specific sealer utilized.
Share this Post
latest posts
-
 Natural stone Tile Seattle February 27, 2025
 -
 Natural stone tiles Dublin January 28, 2025
 -
 Stone tiles for kitchen floors December 29, 2024
 -
 Stone floor tiles Norwich November 29, 2024
 -
 Install stone tile on drywall October 30, 2024
 -
 Crystal Stone Coffee Mosaic Tile September 30, 2024
 -
 Stone Mosaic Tile Company August 31, 2024
 -
 Stone Tile wall cladding August 1, 2024
 -
 Installing Travertine subway tile backsplash July 2, 2024
 -
 Adhesive for stone wall tiles June 2, 2024