
 Stone tile requires exactly the same firm and level environment sleep as ceramic tile - only more so. Because stone is brittle and nutrients that make up its design are not completely "cemented" to one another, it is subject to fracture along the whole grain outlines.
Rock tile usually has actually a dusty residue on its back, and this dust weakens the adhesive relationship. Wipe your hand over the back of the tile of course it comes up dusty, clean the backs associated with the tiles with a sponge and water. Let the tiles dried out before bedding them.
2Lay-out a dried out run so the advantage tiles are the same dimensions. Then break lines as guides. Utilizing white thinset for light-color tiles, trowel thinset regarding the subfloor and backbutter the tile. Set and level the tiles, including mortar into the back as required. Align the tiles with a straightedge.
Step 3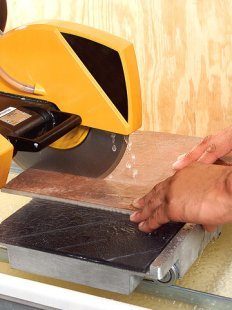 Once the mortar for the area tiles has actually set sufficiently (usually instantly), cut the edge tiles with a damp saw and put all of them in a mortar sleep, backbuttering each tile as you get. Measure per specific advantage tile - it's not likely the room is square and all the tiles equivalent size.
Allow mortar when it comes to edge tiles treatment all day and night. Combine a batch of unsanded grout, adequate to cover a little part. To keep the stone tiles from taking in an excessive amount of water from grout, wet all of them with a spray container. Apply the grout with a float. Eliminate excess grout from area associated with rock. Once the grout has actually set for approximately a quarter-hour, wipe the haze with a damp sponge.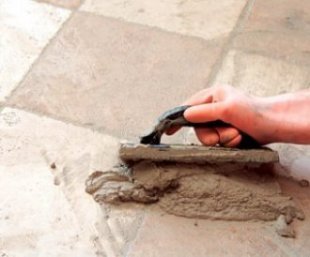 complete grouting the complete set up, employed in sections to completely clean the extra before it hardens. Whenever grout has actually entirely cured, seal the tiles as required.
Cutting holes for hurdles eg flooring vents becomes a comparatively easy task with a dry-cutting saw loaded with a diamond knife. The saw allows you to get all the way into the corners which will make a clean cut.
Mark the overview with a china marker (maybe not a felt-tip, which could bleed). While an assistant steadies the tile, lower the saw in to the middle of line, then back once again to the other spot. Knock out the slice piece with tile nippers and cut the corners square. Don't be concerned in the event that cutline is somewhat errant; it should be hidden underneath the vent address.
Edge tiles unavailable?Some makers create rock bullnose, if your selection doesn't include all of them (therefore require all of them to finish stone-tiled actions or a hearth), make your own by rounding the edges with a rubbing stone. As an alternative focus on coarse carbide sandpaper covered around a wood block and polish with finer grades.
Professional Tip: make use of adhesive options for stoneShare this Post
latest posts
-
 Natural stone Tile Seattle February 27, 2025
 -
 Natural stone tiles Dublin January 28, 2025
 -
 Stone tiles for kitchen floors December 29, 2024
 -
 Stone floor tiles Norwich November 29, 2024
 -
 Install stone tile on drywall October 30, 2024
 -
 Crystal Stone Coffee Mosaic Tile September 30, 2024
 -
 Stone Mosaic Tile Company August 31, 2024
 -
 Stone Tile wall cladding August 1, 2024
 -
 Installing Travertine subway tile backsplash July 2, 2024
 -
 Adhesive for stone wall tiles June 2, 2024