 As soon as we relocated into our home, I adored the scene. We enjoyed a nearby. I adored the potential. But the majority everything else required plenty of work.
We've Been right here almost 5 years now (gasp!) plus that time, we've knocked down wall space, pulled up carpeting, blasted a gap in foundation and place in a staircase…
But.
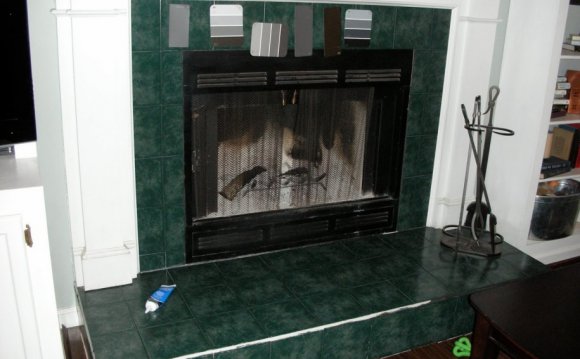
We never ever gotten around to fixing the most hideous functions in the house: the hearth.
At some point, someplace, someone thought a fireplace is tiled in black faux marble with white grout. Sometime, someplace, someone thought silver trim could be outstanding accent on stated fireplace. Sometime, someplace, some body noticed this is an awful idea and attempted to fix it through the use of phony board and white trim into the mantel.
That failed to assist.
We purchased the house with the horrible black colored tile and white grout. We invested numerous nights nursing twins on our couch and staring at that fireplace until I developed a tick within my eye. I hated it plenty. But, other jobs constantly took priority until one-day, I actually arrived in the family area with a crowbar.
 Before I ripped initial glossy veined tile off the beaten track, an idea occurred to me. Why don't you decorate the tiles? If it cann’t work, you can rip all of them down then. However if it can work, you’ve conserved your self a bunch of money and time.
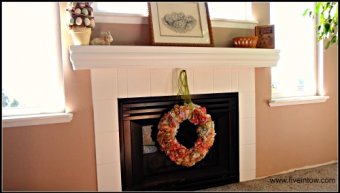
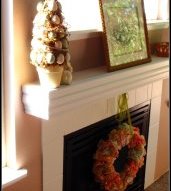
And that's just how I moved from image above to your image below for under ten dollars.
Here’s how I made it happen:
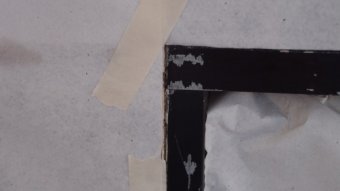
1) the prior owners had attemptedto hang something through the fireplace using double-sided gluey tape. Bad idea.
Because of the damage, I had to tape from the surround and spray paint it (inside your home) utilizing an oil-rubbed bronze shade.
2) used to do a similar thing because of the fireplace screen so that you can rid the world of one more little bit of phony silver trim.
This took many, numerous coats. In retrospect, I should have coughed up the extra couple of bucks the more costly squirt paint. I used Krylon brand and wasn't impressed. DON'T USE THAT PAINT. The paint couldn't like to stick, while we lightly sanded the trim, in the event. Additionally, it flaked down with all the slightest touch. Perhaps not cool.
 I’ve made use of Rust-Oleum for lots of projects (including cabinet draws) but never really had that issue. Therefore, I’ll very likely must re-do this part of the project because I happened to be low priced. In the end, it absolutely was perhaps not really worth a $2 savings.
3) While waiting for coats of squirt paint to dried out, I sanded the tile softly after that painted it with one layer of oil-based primer. I'd some in the storage and this couldn't price any such thing. When you have to get it, go with Kilz brand. Don’t accept such a thing less. It is not well worth a poor result.
 *P.S. I’m not receiving paid to state nutrients about these items. They just work!
4) the following day, following the primer had dried out completely, I painted on it with white enamel paint. I wasn’t sure just what shade to paint the tile at first, but I was hoping that painting it white would create a built-in appearance.
Besides, I had leftovers associated with white paint.
But enamel would have been a great choice anyway. This surround is not going to need resist plenty of damage, but i needed to mimic a tile feel, and enamel paint is pretty close.
This took three coats of paint. In the event that tile have been a less heavy shade, two coats would have been sufficient. But that beautiful black tile passed away hard.
5) We acquired some trim pieces at an area building supply liquidation store. The broad 4″ trim piece cost less than $3. It had been a little too thin, so I bought a coordinating trim piece for another $3. The good looking hubby helped to reduce it and I also nailed it up.
We painted the trim with the exact same enamel paint for a cohesive appearance. I did so sand between your coats of paint on the top layer regarding the mantel due to some harm done towards the the surface of the mantel (possibly that’s why the last proprietors stuck that fake timber onto it!) but sanding is not always needed. If you like a smoother appearance, sand. But i came across sanding wasn’t truly required for almost all of this task.
6) the outcome is really breathtaking, I wish I had done it years ago.


Share this Post
latest posts
-
 Natural stone Tile Seattle February 27, 2025
 -
 Natural stone tiles Dublin January 28, 2025
 -
 Stone tiles for kitchen floors December 29, 2024
 -
 Stone floor tiles Norwich November 29, 2024
 -
 Install stone tile on drywall October 30, 2024
 -
 Crystal Stone Coffee Mosaic Tile September 30, 2024
 -
 Stone Mosaic Tile Company August 31, 2024
 -
 Stone Tile wall cladding August 1, 2024
 -
 Installing Travertine subway tile backsplash July 2, 2024
 -
 Adhesive for stone wall tiles June 2, 2024