
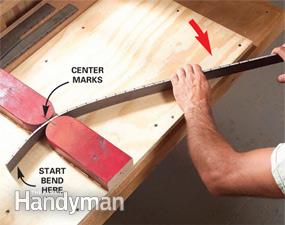
Photo 4: Bend slightly at each level
Mark the 1/4-in. x 1-1/2 in. x 36-in. metallic bar any inches with a permanent marker. Align the scars using the center markings regarding 2x4 blocks and firmly pull the club until you feel it fold somewhat. Go the club to another inches level and continue with slight bends at each and every level.
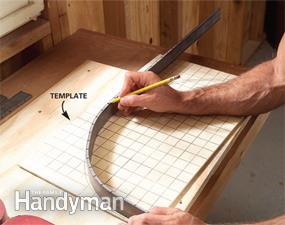
Photo 5: Check the bend while you get
Look at your curved bar along with your template. After that insert the bar to the jig again and either bend or unbend it as required. If you are done, slice the metallic to a 28-in. overall length with a hacksaw. Then smooth the rough sides with a metal file.
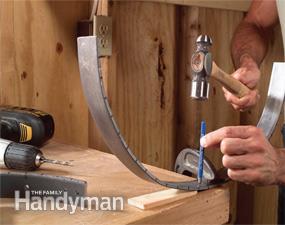
Photo 6: Mark the holes
Clamp the curved feet towards workbench, after that make use of a-sharp punch to mark the hole facilities for the mounting screws in addition to set up bolts. Drill holes at 1/2 in., 1-1/2 in., 4 in. and 14 in. from the upper end.
Picture 7: Drill the screw and bolt holes
 Drill the 3/16-in. diameter holes through the legs, utilizing several drops of oil to lubricate the little bit. Always clamp the metallic solidly while drilling.
Photo 8: Bend the struts
Slice the 8-in. long struts from 1/8-in. x 3/4-in. metallic together with your hacksaw. Place a mark 1-1/2 in. from each end. Align the markings aided by the vise jaws, tighten and then hammer the piece to make crisp 90-degree bends. Center and drill bolt holes in accordance with the strut information in Figure A.
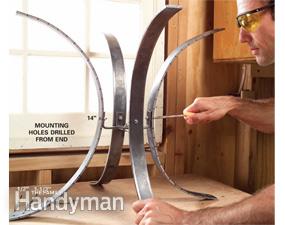
Photo 9: build the legs and struts
Screw the struts toward legs utilizing No. 10 x 3/4-in. bolts and peanuts. Tighten with a screwdriver. Note the position regarding the installing holes.
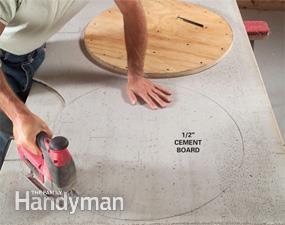
Picture 10: slice the cement board disk
Position the disc on an item of 1/2-in. concrete board and locate the group. Then cut it with a jigsaw fitted with an abrasive cutting blade.
Photo 11: relationship the concrete board and plywood
 Mix about 1-1/2 qts. of thin-set mortar to a toothpaste consistency. Allow the mortar are a symbol of ten full minutes, after that spread it onto one part of your disc with a 1/4-in. notched trowel. Screw the cement board into the plywood with 1-1/4 in. concrete board screws.
Picture 12: Attach lath
Reduce 1-3/8 in. strips of galvanized broadened metal lath (stucco lath) 7 ft. long. Nail the pieces on side of the disk. Use 1-1/4 in. galvanized roofing fingernails and space all of them every 4 in.
Photo 13: Cover the lath with mortar
Set the disc on a synthetic sheet and mix about 1 qt. of thin-set mortar. Embed the mortar when you look at the lath. Allow it dry instantly. Then smooth off ridges and edges with a rasp.
Mark the 36-in. metal club every inch (up to 28 in.) as shown in picture 4 with a permanent marker. You’ll take off the residual 8 in. later on, however for now, you’ll require it for influence while bending. Purchase a supplementary piece just in case one doesn’t change out—the bending procedure may be challenging.
Slip the bar between the blocks, align the first level with the center and pull the bar toward you. This first little fold is easy as you have plenty of mechanical benefit. Don’t be tempted to overbend; a tiny nudge at each mark adds up to a nice equal bend.
When you are getting toward the previous couple of markings of bending, you may want to pull the bar from the curved side getting a little more leverage. Look at the work piece every 5th fold roughly to see how it's matching up with your template. You may have to stick the leg piece back in the jig and unbend portions to get the curve to fit your template. Don’t allow yourself get also curved regarding form trying to conform exactly into the template. Close is good enough.


Share this Post
latest posts
-
 Natural stone Tile Seattle February 27, 2025
 -
 Natural stone tiles Dublin January 28, 2025
 -
 Stone tiles for kitchen floors December 29, 2024
 -
 Stone floor tiles Norwich November 29, 2024
 -
 Install stone tile on drywall October 30, 2024
 -
 Crystal Stone Coffee Mosaic Tile September 30, 2024
 -
 Stone Mosaic Tile Company August 31, 2024
 -
 Stone Tile wall cladding August 1, 2024
 -
 Installing Travertine subway tile backsplash July 2, 2024
 -
 Adhesive for stone wall tiles June 2, 2024